Hunting for Something?

Sunday, September 29, 2019

3 Ways to Thoroughly Screw Up a Pork Shoulder


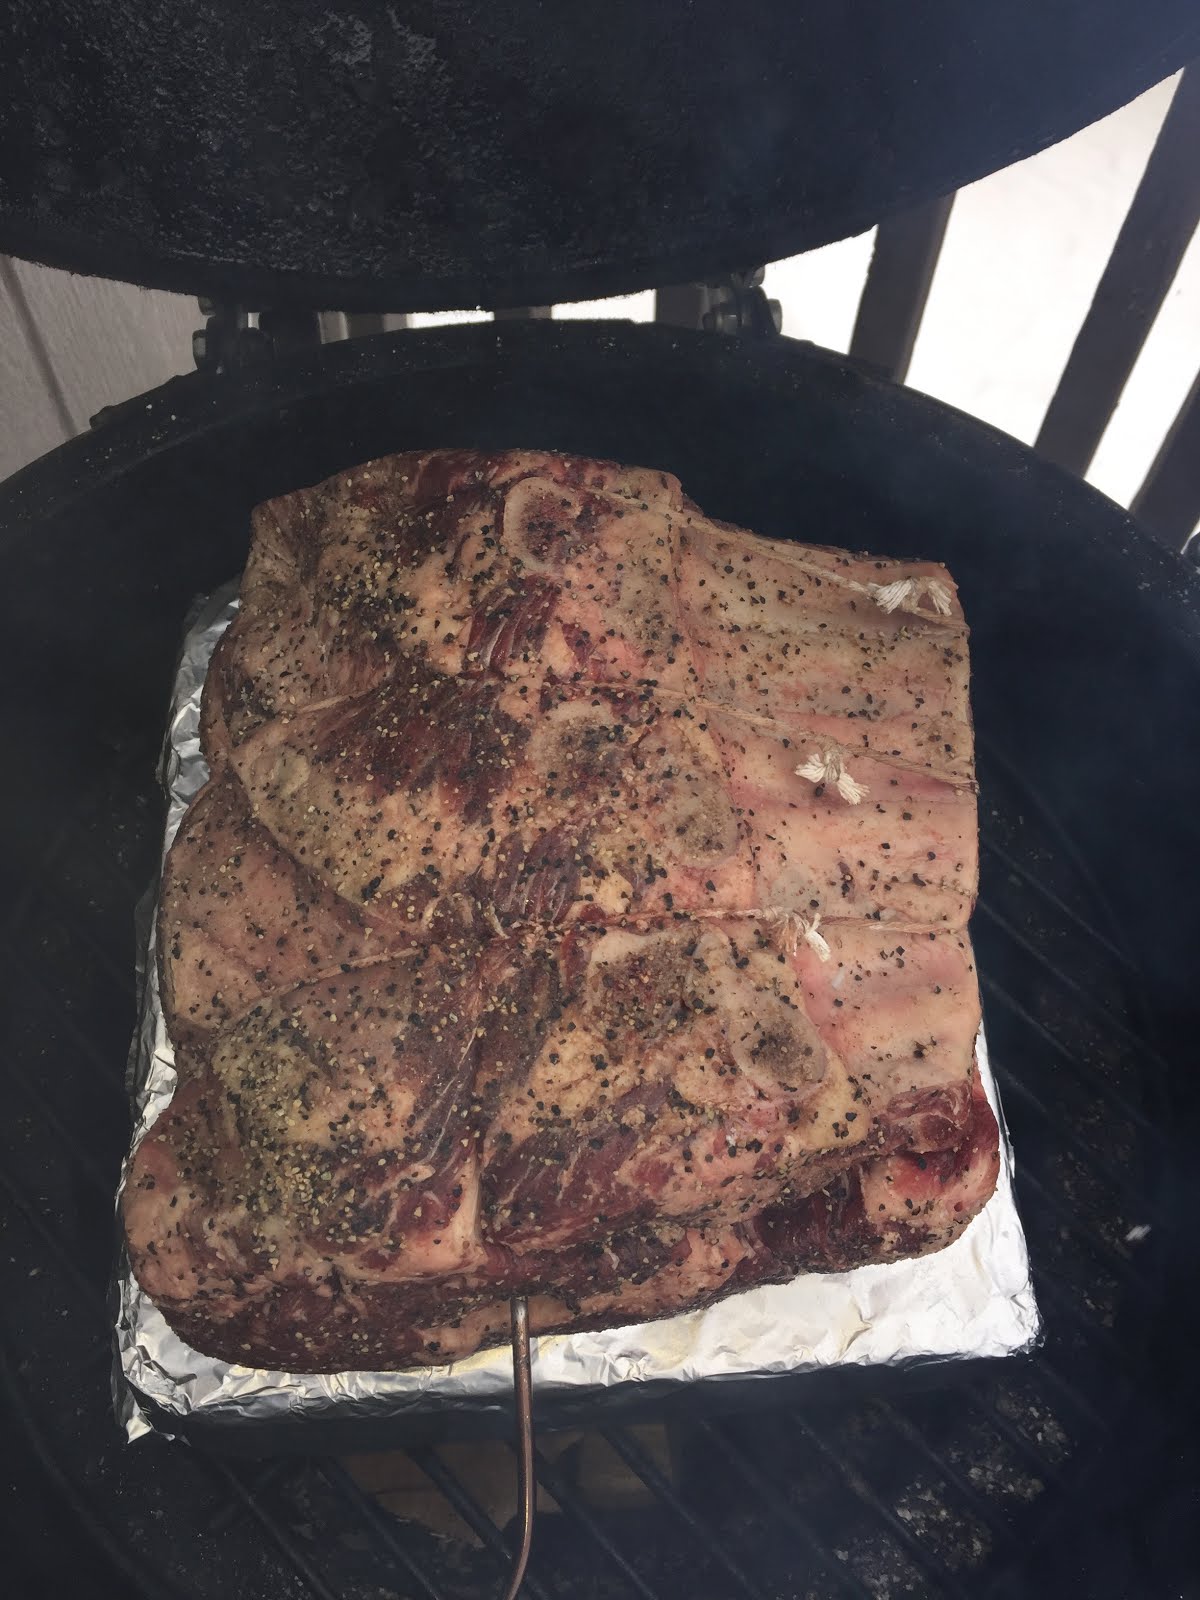
This is what a pork shoulder should look like. Crisp bark on the outside. Pink smoke ring underneath. The meat beneath is tender but, like good pasta, still has some bite.

Our claws digging into it is a nice touch.

Pork shoulder overall is a forgiving peace of meat. Take some time with it and you'll get good results. It's not rocket science. We spent a month in 2017 studying the Boston Butt. This isn't a soufflé. Anyone with a smoker or an oven, some basic seasonings and some patience can make good pulled pork.

But as soon as you think you're good at it and slip up, you can screw this up.

Here's how I did it.


That's what a pork shoulder should sound like. The crackling of the crust. The wet, sloppy tearing of meat. Glee and giggling. 

I've done a number of  shoulders and I started to believe I was good at it. I started to think they were easy.

Then this happened:


Kind of an ashy sound at the start. It all came apart too easily. Not enough pull from the pulled pork. But the biggest problem?

Dead silence.

My wife and kids were watching. Normally they are excited at this moment. The prep, the hours, the smells, the anticipation. Typically they are stoked.

This time they were appalled.

So what went wrong?

1 - I Set a Deadline

The worst barbecue question ever is: "Is it done yet?"

You don't cook barbecue for now. You cook it for tomorrow. Like bread or wine, it can't be rushed. It will be done when it is done.

If you're hungry, don't push me. Eat something else.

But my son had a birthday party to get to at 2pm. We had some kids to zap with lasers. We wanted to eat pulled pork before we left. Therefore, I wanted the shoulder to hurry the hell up.

Shoulders don't play that.

2 - I Cooked it Too Fast

If it takes six hours at 300º then it will take two hours at 900º, right?

I didn't push it that hard, but I screwed up.

225º Fahrenheit is the money temperature for barbecue. Under that is fine but too far over is a recipe for disaster.

I'd smoked this shoulder all night, but it still wasn't near my target of 190-200º. I needed to get it hot enough for the connective tissue and fat to melt.

I commonly smoke for flavor then bake for tenderness. I'll finish a shoulder in the oven overnight at 225º because I can easily control the temperature and sleep at the same time.

Plus, the house smells like roasted smoked pork in the morning. Major bonus.

This time I tried 250º, then 275º and eventually 350º to get the meat up to temperature in time for lunch.

The beautiful fat cap on the butt turned bitter and black.

Oops.

3 - I Got Cute with the Rub

I have a basic formula for barbecue rub based on Alton Brown's 8:3:1:1 ratio. I'll change the ingredients based upon what's in the pantry, but this time I tried to get real creative.

What if I could get a toasty crispy element to the rub by working in some corn meal?

Fail.

Corn meal can be roasty and crunchy in the right application, but on top of a pork shoulder it just got mushy. It was the opposite of bark. It was more like a log that had been in a swamp too long.

We'll be keeping cornmeal out of the rub for the remainder of eternity.

A proper rub is a combination of sweet, spicy and salty. I like some seeds in there (coriander, celery, caraway or whatever you got) because they get more expressive when they toast. Essentially, it's the proteins, salts and sugars that form an irresistible crust on your roasted meats.

Save the cornmeal for deep-frying.

And in Conclusion...

Take your time with your meat. Also be patient with your cook. Barbecue will not be done because you want to eat it.

Plus, you can always cook slower, but too fast is the path to doom. Start early. 

Analog charcoal-and-vent smokers are tough to control. In a perfect world, they'd always be at the perfect temperature. But in the real world, you just don't want them too hot. Smokey and too low is better than too hot.

Once scorched, a piece of meat is never going back.

There's nothing wrong with letting ribs or a roast rest wrapped-up at a holding temperature. You can bring chilled barbecue to your friend's party and re-heat it in their oven. It will turn out great.

But try to rush the cooking process and you'll end up with something your dog won't eat.

And cornmeal in a seasoning rub? Hell no.


Friday, January 26, 2018

Chasing Holiday Beef


We don't eat a lot of beef in our family. Nothing against cows, but we're pork, chicken and seafood people mostly.

And for some reason Jana wanted Tri-Tip for Christmas. Who am I to blow against the wind, right Paul Simon?

Besides, so many of our Legion of Dragon Knuckle buddies cook a lot of Tri-Tip and do it well. Many of them are South-Westerners and it seems to be a California and Arizona thing.

My parents were in town for the holiday and they recently moved to Arizona, as many retired folks do. They'd asked me for advice on Tri-Tip, although I had no experience with it.

With the help of the DK Community, I was sure I could show them how it was done.

So off to my favorite supermarket a couple days before Christmas to get some supplies. I'd seen Tri-Tip there before, but found none on that day. It must have been summer when I'd seen it previously, because the butcher said it was very seasonal up here in Washington.

Plan B.


So grabbed an 8 pound bone-in beef rib roast. I made one of these a few Christmases ago and it turned out nice. That one was in the oven, but this one I was going to smoke.

As soon as I had it home, I posted a picture of my new buddy on Instagram and asked for guidance. Marinate? Brine? How should I prep this thing?

Common opinion was that I should season it heavily and wrap in plastic wrap. Now I have my own impossible to acquire (don't ask) rub I use for most things, but I recently got a pack of good stuff from 7 Sins BBQ


In the Barbecue and Grilling Community, we share a lot of gifts. Stickers, t-shirts, rubs, sauces, gloves and other gear.

So the most logical seasoning was my new 7 Sins Beef Rub.

After almost two days in the fridge, it was late Christmas morning. All the gifts were open and it was time to get cooking.

I get more excited now about Christmas food than Christmas gifts.

I ran out of charcoal months ago and still use only straight wood in my Big Green Egg, but I'm running low. I sparked a fire with the last of my maple, let it burn down then closed the vents most of the way and let the fire struggle.

Then I wrapped my square patio stone in foil, sprayed it with oil and set it on the grill. I put the meat on the stone, as usual.


I use this trick because with a standard BGE, the fire is right below the meat and will scorch the bottom. With the stone in place, the heat becomes indirect.

I don't know how long things were cooking or truly how hot the barbecue was. I only have a single probe thermometer, which was in the meat.

I should have one of those multi-probe wireless thermometers. Then I could monitor the temp at the upper vent and in the meat at the same time.

Regardless, I cooked it to an internal 130º Fahrenheit, expecting about 10 degrees of carry-over.

My plan was to use the reverse sear technique, which I've never used. I was going to build a campfire, put a grill over it and char the edges.

Yet when I opened the lid it was already barktacular. I wasn't messing with this thing any more. All it needed was a rest, a knife and a fork.


After 20-30 minutes, I went to cut the bones from the roast and found they came off in my hand. I cut one bone off for my dog and saved the rest for soup.

Then it was time to slice.


I'm very pleased with the crust, the doneness and the tenderness. The exterior had a little too much bite from the smoke. Perhaps it was the straight maple.

My resolution for 2018 is to cook with a wider variety of wood. With a little hunting, it's not hard or expensive to find. Here in Washington I should be able to find trimmings from fruit and nut trees. The orchardists my be happy for me to haul them off.

Happy New Year. Your advice is welcome. We're still learning every day.

Friday, November 17, 2017

The New Thanksgiving Tradition: Brown Rice and Bacon Turkey Stuffing

Image via Flickr by Dani and Rob

Some things are just supposed to taste the way Mom made them.

To me, turkey stuffing should be made from cubes of bread, Italian sausage, celery and whatever seasonings Mom always put in hers.

But our first kid has a wheat allergy, so what's a dad to do? Substitute gluten-free bread? Without a gluten structure, the bread would probably reverse-engineer into some kind of rice pudding goo.

Not in our turkey.

So (sorry Mom) I had to scrap that idea and start from scratch. Why not use a hearty brown rice as a base for stuffing?

And what goes great stuffed in, wrapped around or just plain next to everything? Bacon.

I don't have pictures or video for you right now because I won't be making this until the day before Thanksgiving, but I'll give you the playbook.

1 - In a big sauté pan, add lots of chopped bacon. Of course you cannot make too much. Extra bacon will find its way into the potatoes, vegetables, salad or just into your face. Turn on the heat and render the bacon until crisp.

2 - Remove most of the bacon from the pan and drain off the bacon fat. Leave enough fat in the pan to coat it and leave a cup or so of bacon pieces. Meanwhile, boil some water in an electric kettle.

3 - Add some chopped onion to the hot bacon pan and let that sizzle for a few minutes before adding chopped garlic. Give the garlic a minute or so.

4 - I forget how much rice will fill an average turkey, but again, too much is not a problem. Cooked a second time inside a turkey or not, this stuff is good. Add three or four cups of brown rice to your hot bacon pan. Stir it around to toast and pick up flavor from the pan. Add two cups of boiling water per cup of rice. 

5 - Turn the heat down to low. Add some black pepper and whatever herbs you have, fresh or dried. The bacon may have put enough salt into the environment, so don't add any until you've tasted the finished rice. Let this simmer until almost done. Don't overcook the rice. It's still going to spend some time in a hot turkey, so stop when it still has some bite.

6 - Taste it and add some salt or other seasonings as you like it. Pungent is good here because it will flavor the turkey from the inside. I cook this a day ahead and keep it in the fridge.

7 - When it's turkey time, heat up the stuffing in the microwave if you cooked it ahead of time. It's important to add the stuffing hot. Since you're stuffing it inside a raw turkey, it needs to hit 165ºF to be safe to eat. At the center of the bird, this will take the longest time to hit that temperature. The surrounding poultry will be overcooked by then. So add the stuffing while steaming hot.

Necessity is a mother of an invention. I made this recipe because I had too. Now several Thanksgivings later, this is what turkey stuffing is supposed to taste like around our house.

It's (almost) as good as Mom's.